
Updated
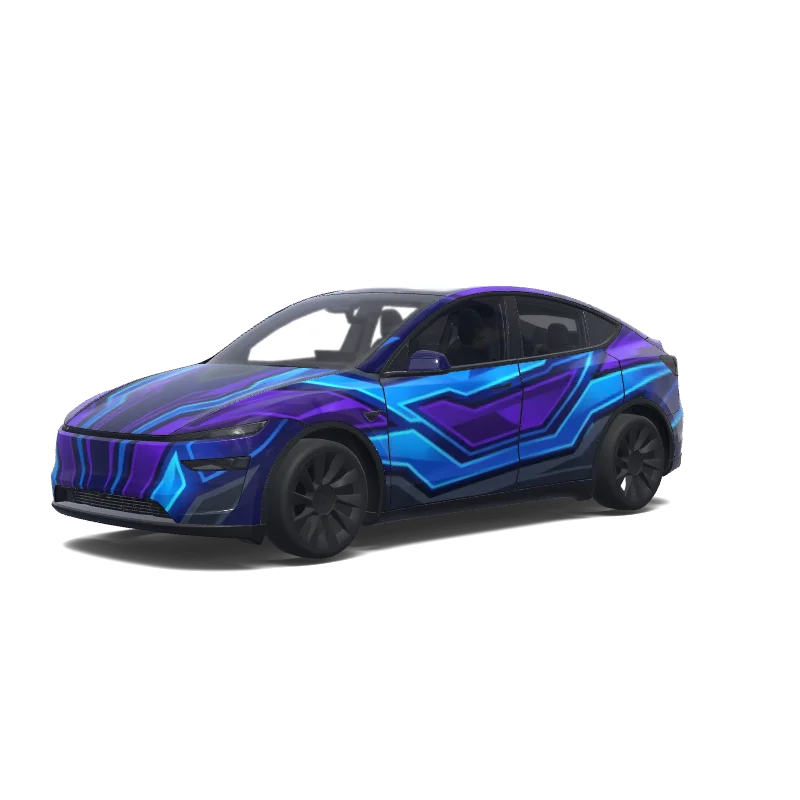
Start a Model Y wrap with a color plan you can actually edit: a body color, a contrasting panel and one small accent. Below are four original Paint Shop design briefs with exact hex colors and a construction order. They change the digital car on screen; they are not vinyl-film recommendations or finished PNG downloads. Choose your exact Model Y version before building one.
Community designs to study
Look at the actual designs below for color and placement references. The original exercises later in this article are separate design briefs.

The horizon is the recognizable element. Inspect where it meets the doors and front panels when planning your own landscape reference.
Open this design in the editor →
Large colored shapes remain distinct from the dark base. Notice the change in scale between the door motif and the smaller accents toward the front.
Open this design in the editor →| Plan | Start here if… | Main revision risk |
|---|---|---|
| Harbor | You want a restrained daily look | A dark hood can become a separate-looking block |
| Apricot Club | You want a cheerful graphic identity | Small lettering disappears at normal viewing size |
| Cedar Trail | You prefer a nature-inspired palette | A continuous landscape breaks at door seams |
| After Hours | You want a dark design with a bright cue | Too many tiny lights create visual noise |
Harbor: a light body with a navy anchor
- Body
#DCE7EA - Hood
#173344 - Accent
#E7A96B
This is the least intricate starting point. Use a cool pale body and one large navy area instead of filling every panel with pattern. The warm accent gives the design an identifiable detail without introducing a second motif.
- Fill the body regions pale blue-gray. Color the hood navy as a separate edit so you can reduce its visual weight later.
- Add one small apricot rectangle on each rear-side region. Position each one independently while rotating the preview.
- If the hood dominates the front view, repeat a little navy on the lower rear rather than adding more apricot everywhere.
Preview check: View the car at its ordinary preview size. The warm accent should still be visible without becoming the first thing you notice from every angle.
Apricot Club: two color fields and one original word
- Body
#F1BB91 - Graphic
#374C64 - Light
#FAF2E8
Choose a short word or initials that belong to you, such as a made-up club name. The composition uses a dark door badge against a warm body. It does not need borrowed racing sponsors or a character illustration to have personality.
- Begin with the apricot base. Place a dark, simple badge well inside a door panel, leaving space around the door edge.
- Add pale text as a separate layer. Keep the word on one panel rather than spanning both doors.
- Make the opposite-side version separately and check that it reads normally; reflecting the entire badge would reverse its lettering.
Preview check: Rotate away from the hero angle. If the letters vanish in the side view, enlarge the word or remove it and keep the graphic alone.
Cedar Trail: separated silhouettes instead of a panoramic photo
- Body
#355848 - Silhouette
#182D28 - Highlight
#E2C69A
Treat each door as a small scene using two or three broad shapes. A mountain on one panel and a tree on the next can belong to the same design without pretending to be one continuous photograph. The shared palette connects the separate pieces.
- Fill the body with cedar green. Use your own simple dark silhouettes or an original transparent illustration.
- Keep each recognizable shape inside its panel. Use a plain dark area near a seam if two neighboring pieces refuse to align.
- Reserve the sand highlight for a single sun or trail marker. A large simple mark survives reduction better than a field of small leaves.
Preview check: Check that the hood is not a second competing landscape. A plain hood can give the door artwork room to be noticed.
After Hours: dark blue with a broken electric accent
- Body
#121B30 - Secondary
#465276 - Accent
#B9E7DC
Use one pale green accent repeated in a few deliberate places. The effect comes from contrast, not actual glowing light: a PNG cannot add emissive lighting to Paint Shop. Keep the design readable even if the vehicle lighting makes the dark base less distinct.
- Set the body dark blue, then choose only a few panels for the secondary slate color.
- Place short mint blocks near the front-side and rear-side regions. Do not rely on a thin unbroken line wrapping around the entire car.
- Inspect the exported PNG for banding if you add gradients. A flat dark field is an easier first version than a noisy star texture.
Preview check: Zoom back out and remove any detail that reads as random bright specks. Keep one clear accent rhythm.
Match the Model Y template before using the palette
Tesla’s official catalogue separates the original Model Y from the 2025+ Standard, Premium, Performance and Model Y L entries. Pick the matching entry in the template library. A color palette can be reused across these versions; the actual arrangement of a PNG cannot be assumed to transfer. Our Juniper template guide handles that choice in detail, while this page focuses on what to put on the selected panels.
Build one small study before decorating every panel
Choose one of the plans and make the main body color, hood treatment and one door detail first. Save this as a project before experimenting with another direction. Work with separate text, image and shape layers so a good base does not have to be regenerated when a small detail is wrong. If you use AI for the initial artwork, regard its result as a draft and inspect the same panel decisions manually.
Keep the material claims honest
These recipes control image color and pattern. Calling a palette satin, chrome or metallic does not turn a PNG into a physical material or change the preview’s lighting model. Compare the design from several angles and keep highlights already painted into an image from becoming confusing fake reflections. If your goal is an actual exterior wrap, discuss materials and installation with a physical wrap provider.
Download the texture and keep the car view as a reference
The file to transfer is the flat exported PNG, not this article’s cover image. Our cover shows a credited community design, not the finished result of any recipe above. After exporting, check the filename and file size, transfer the original PNG, and select it in Paint Shop on a compatible vehicle. Keep a screenshot separately if you want to compare the result later.
Questions before you export
Do these Model Y ideas work on a Juniper?
The colors and design brief can. Rebuild the artwork on the correct Juniper trim template; do not reuse an original Model Y PNG merely because the palette is the same.
Can I download these exact four designs?
These are original instructions for making your own version, not four completed downloadable textures. Use the matching gallery for ready-made PNGs or start in the editor with the palette you prefer.
Continue with your wrap
Sources and compatibility
File requirements and template selections are checked against the sources below. Original palettes and layout exercises are design suggestions, not official Tesla designs or vehicle test results. Your vehicle’s features and software determine final compatibility.